BYOB - Bundle Gift Box Builder is a Shopify app that allows merchants to create customizable product bundles or gift boxes. It provides a guided step-by-step shopping experience where customers can choose a box, add products, include greeting cards, and personalize their orders.
1. Who is it for?
BYOB ‑ Bundle Gift Box Builder is designed for:
- Gift and lifestyle stores that sell curated boxes.
- Subscription box businesses offering seasonal or themed bundles.
- Retailers with upsell opportunities who want to increase average order value.
- Any Shopify store looking to offer flexible product bundling and
personalization.
Key Benefits(short overview)
- Increases average order value with bundles and upsells
- Improves customer experience with a guided flow
- Reduces manual work by syncing inventory automatically
- Supports personalized products with custom fields
- Helps in curating themed bundles for special occasions
Feature Summary
- Bundle Types → Predefined 4-step gift flow, product-only builder, box +
product builder
- Personalization → Text fields, image uploads, and image checkboxes for
custom products
- Discount Options → Order amount-based, product-specific, and
quantity-based
- Inventory Management → Auto and manual sync with Shopify inventory
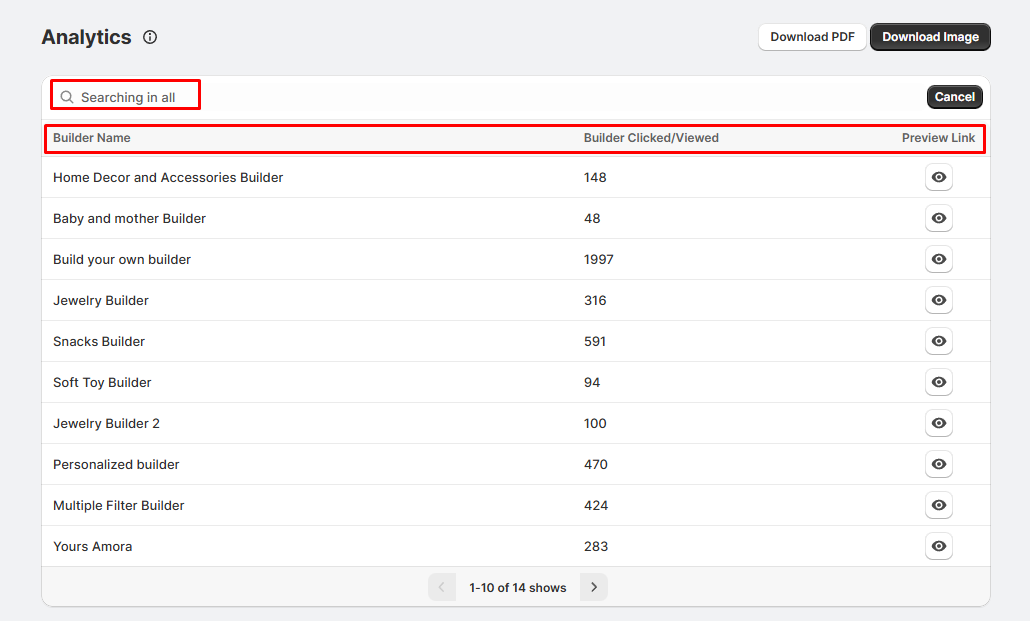
- Analytics → Track views, add-to-cart clicks, and total orders received
through the app
- Multiple Builders → Create separate builders for different collections or
themes
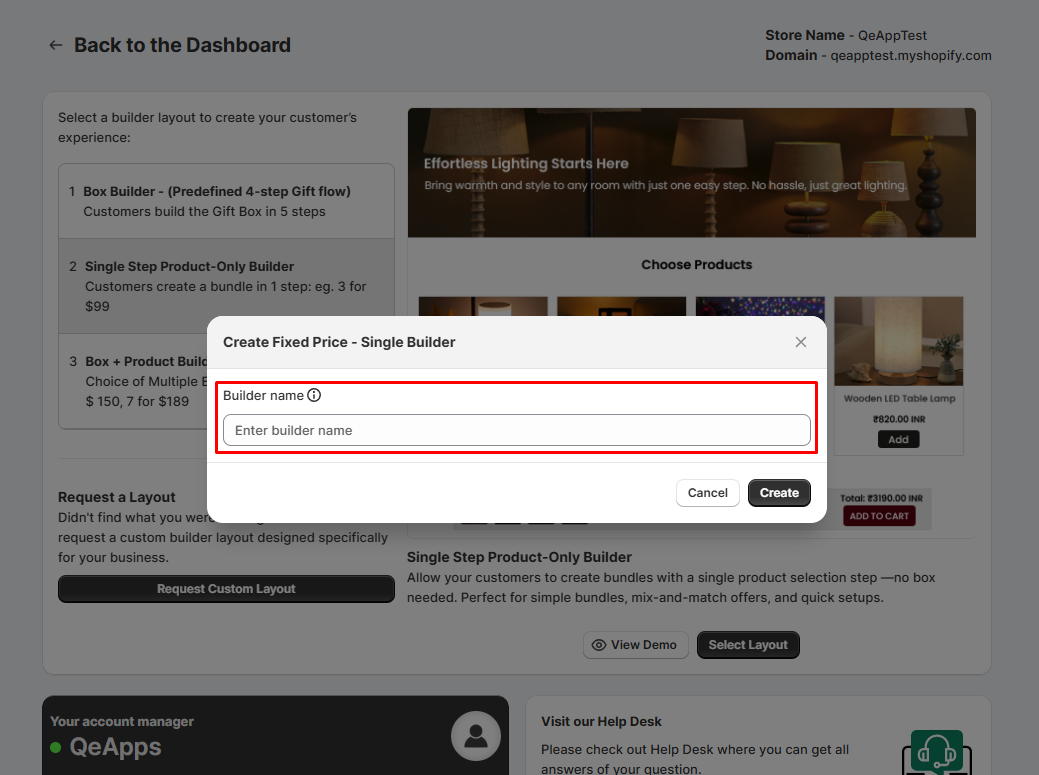
2. Creating Your First Builder
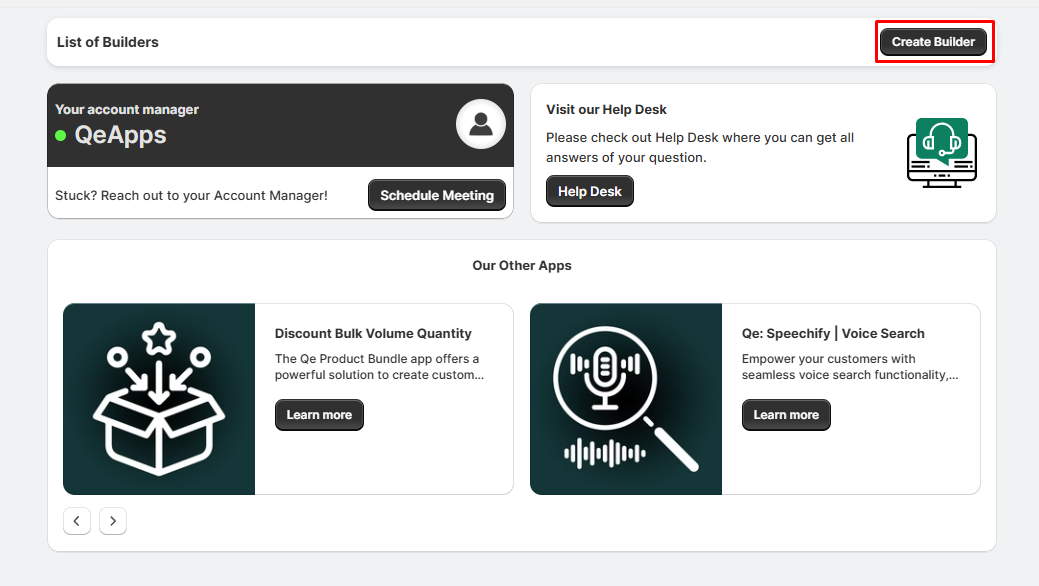
Access the Dashboard
- Log in to your Shopify Admin account.
- Navigate to the app dashboard.
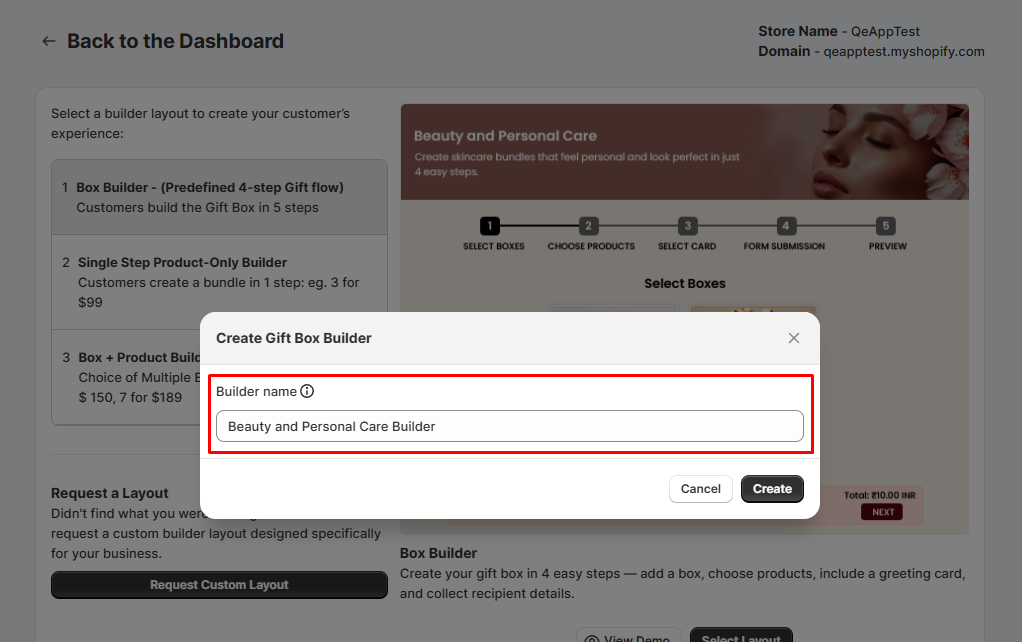
Create a Builder
- Click on the Create Builder button to start the builder creation process.
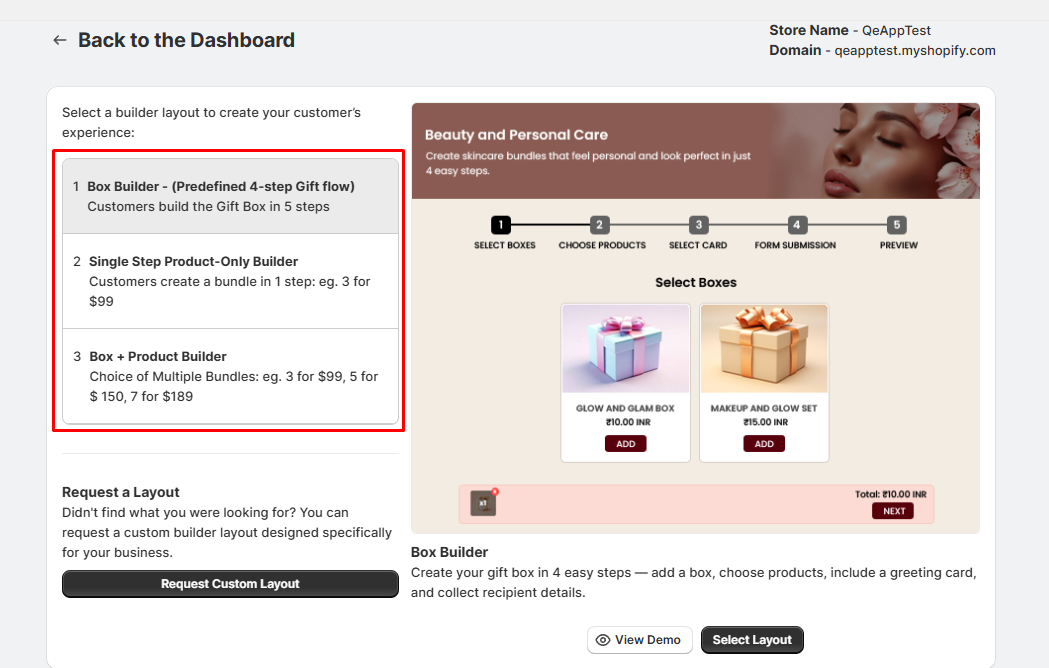
 Choose a Layout
When creating a builder, you’ll first need to choose a layout. There are three available options:
- Box Builder – Predefined 4-Step Gift Flow
- Single-Step Product-Only Builder
- Box + Product Builder
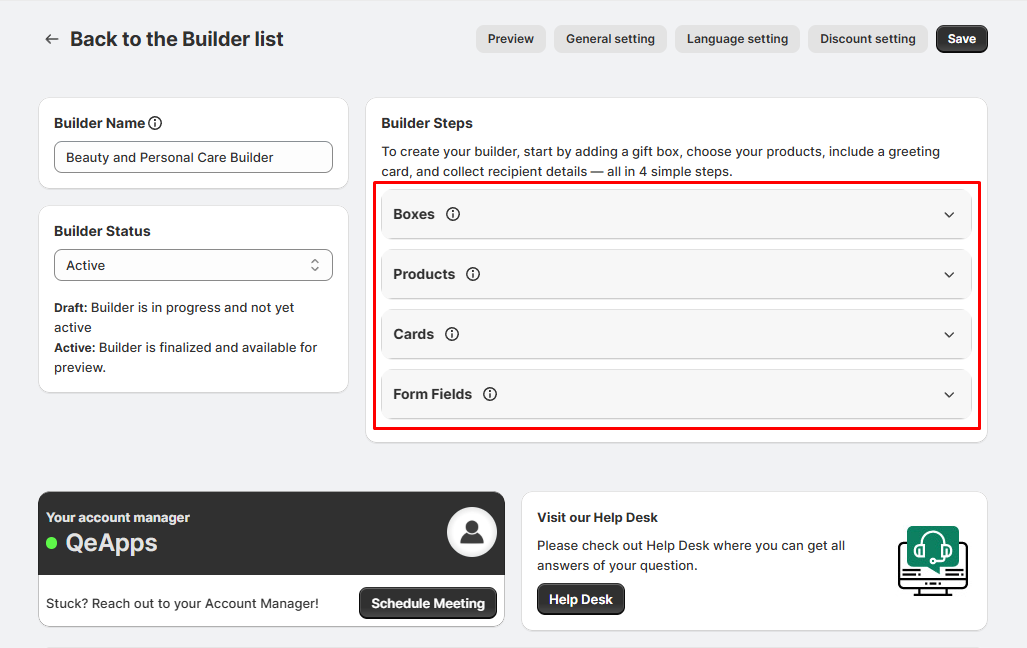
3. Box Builder – Predefined 4-Step Gift Flow
This layout follows a fixed 4-step flow:
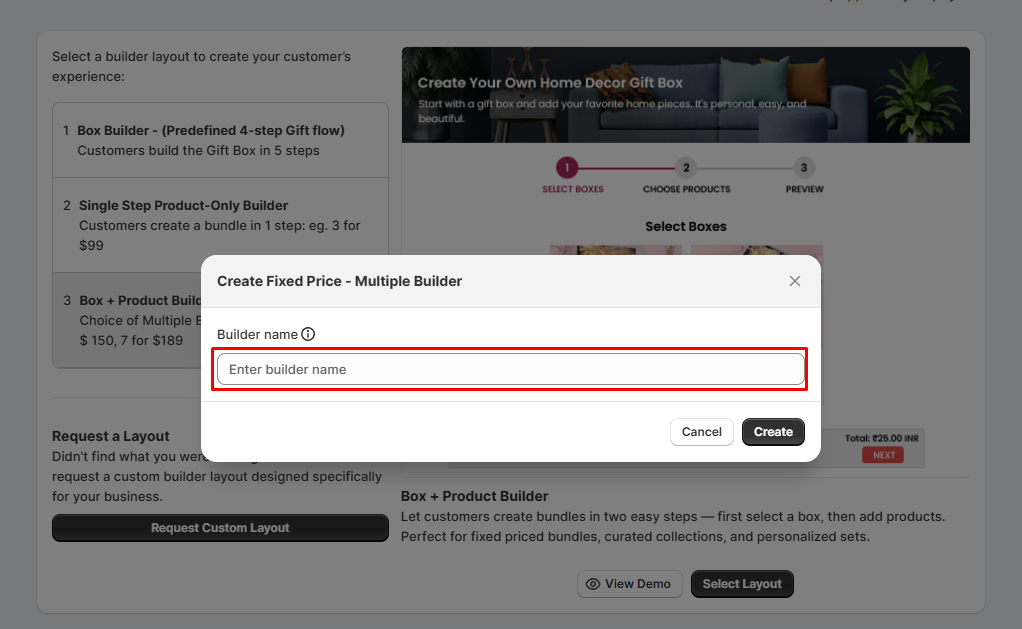
Start by providing a name for your builder
- Add Boxes
- Add Products
- Add Cards
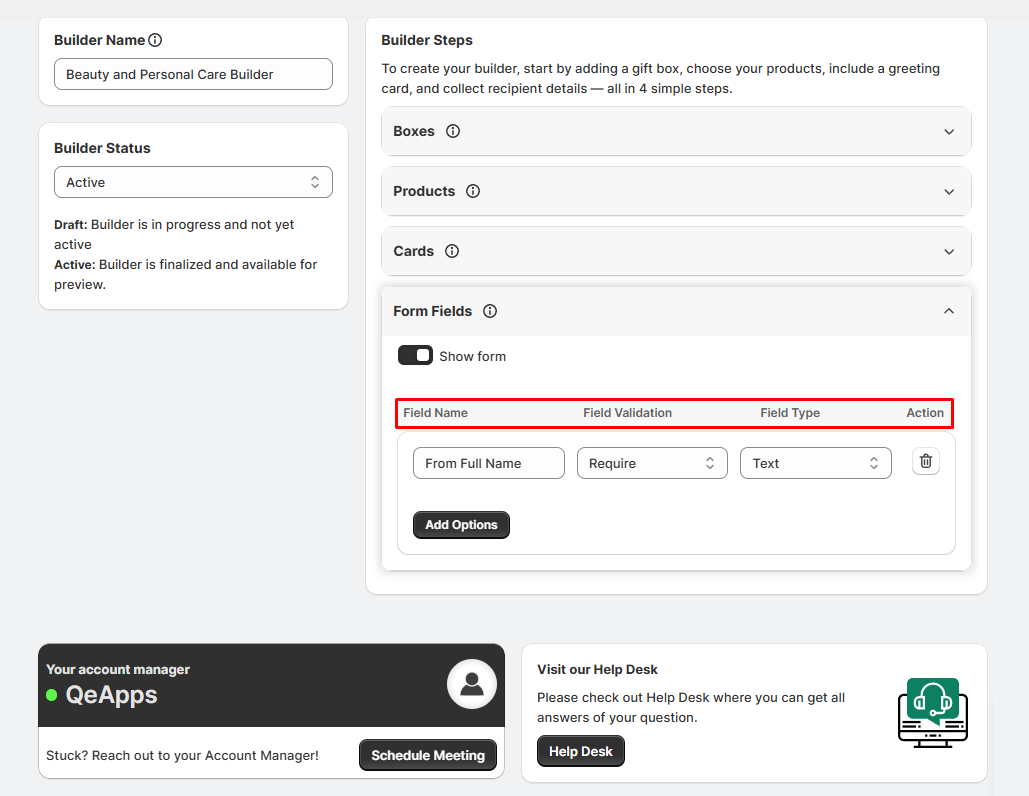
- Form Fields
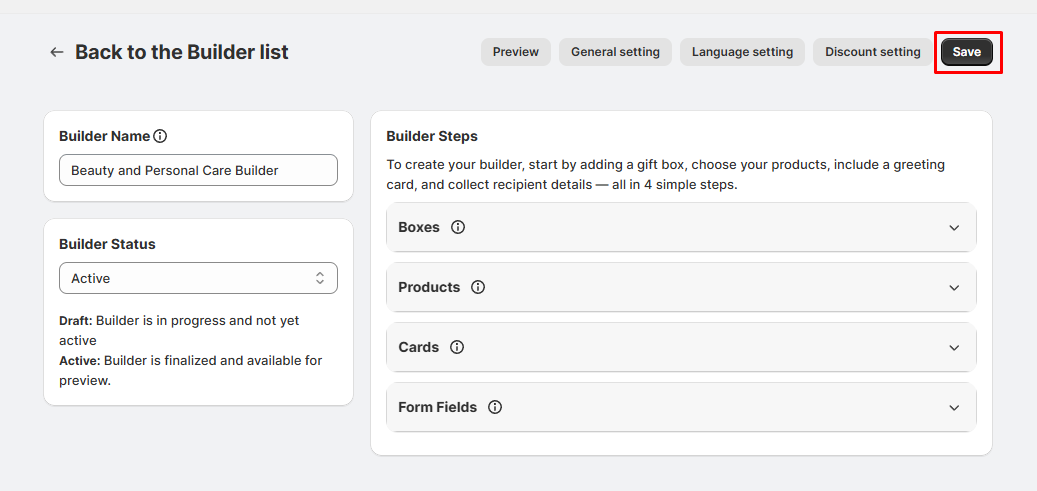
Step 1: Name Your Builder
- Enter a name for your builder in the “Builder Name” field.
 Note:
Note:
- The builder name will not be visible to customers.
- It is only used internally within your dashboard.
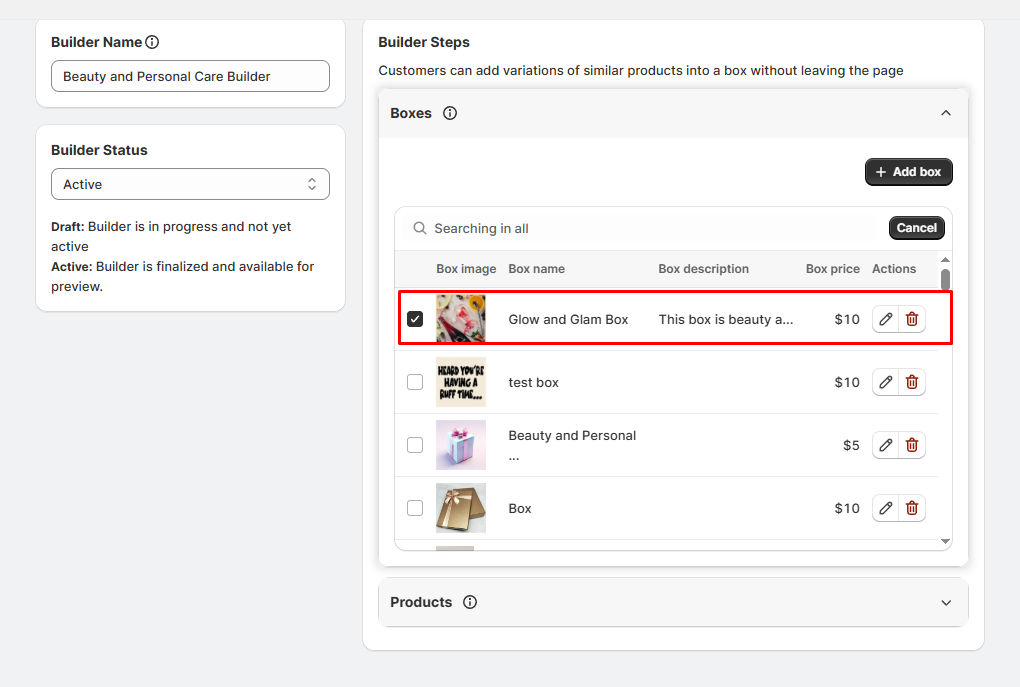
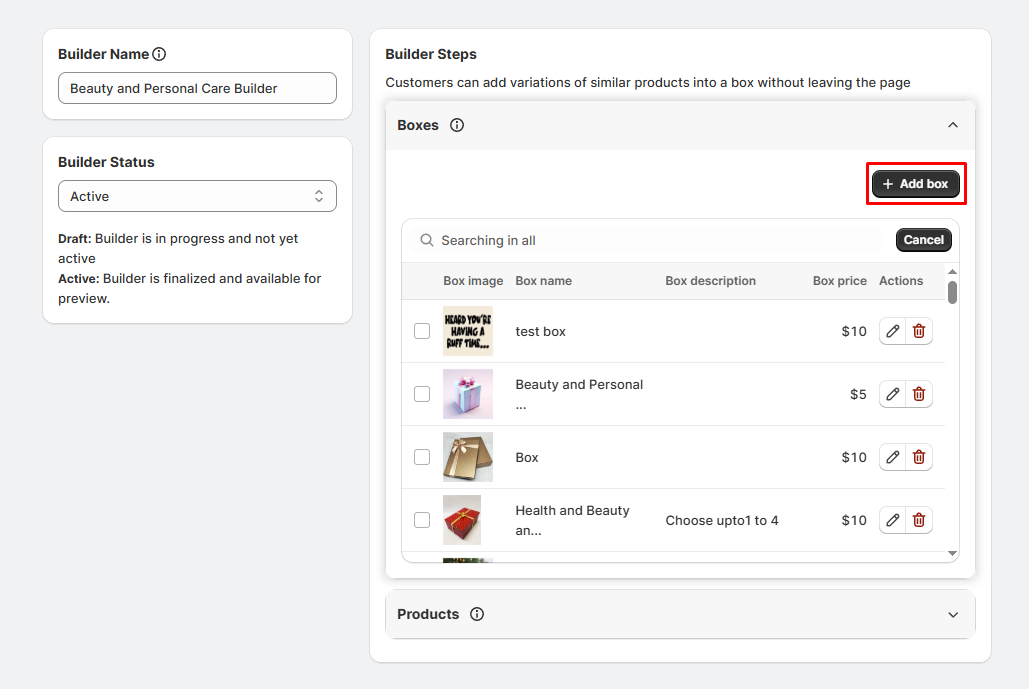
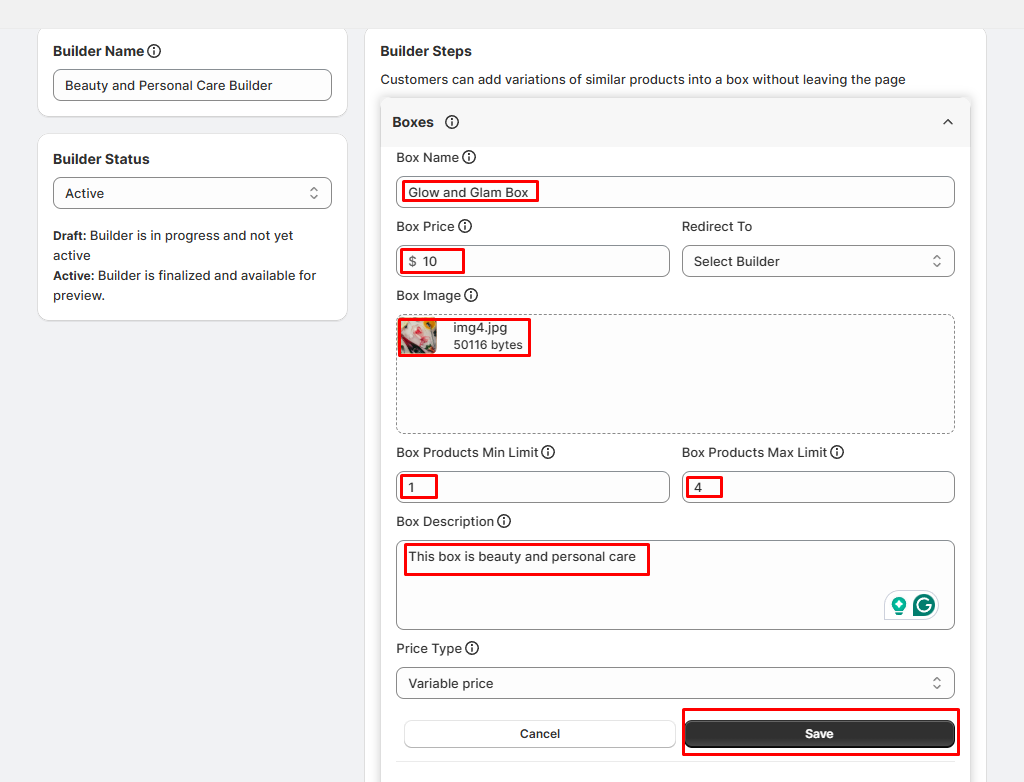
Step 2: Add Boxes
Add Gift Boxes
- Click “Add Box” to create a new gift box option.
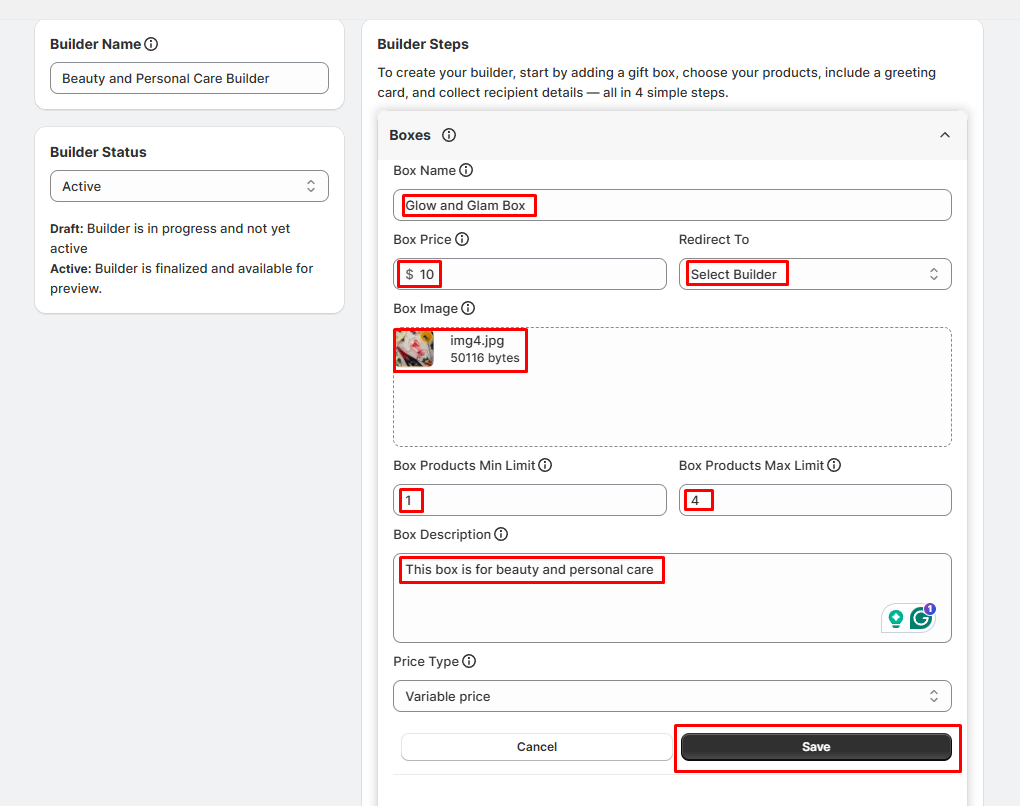
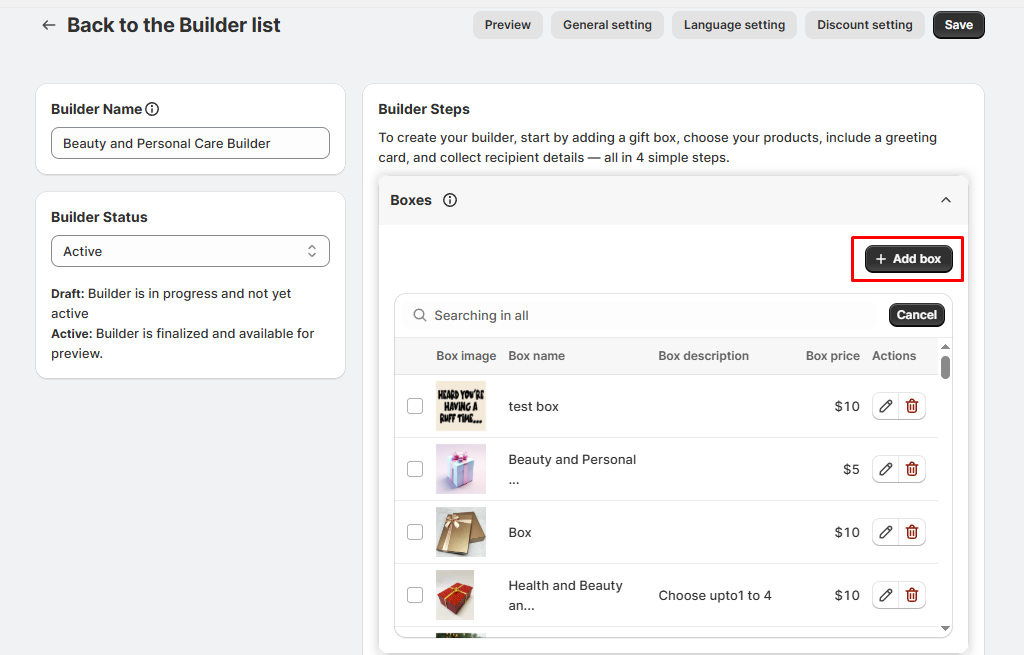 Box Details
- Box Name: e.g., “Christmas Box for 3 Products”
- Upload Image: Provide one image to the box.
- Box Price: Set a price for the box (use $0 if it’s free).
- Min/Max Product Limits: Define how many products the box can hold
(e.g.,
minimum 2, maximum 5).
- Box Description: Add details such as the theme (e.g.,
Christmas-themed,
eco-friendly, red & gold), size/dimensions, and how many items it can accommodate.
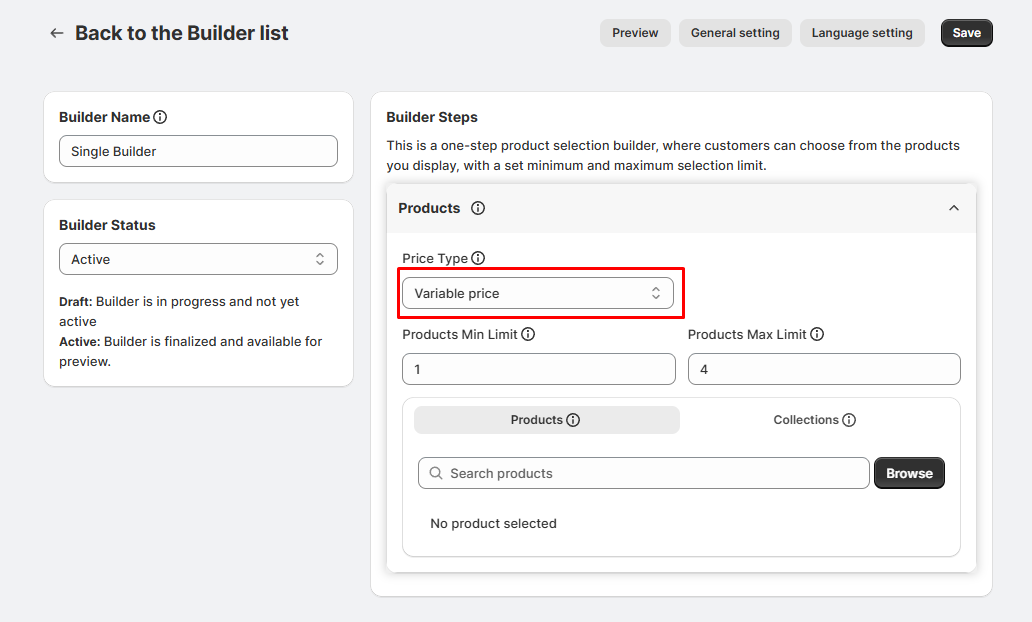
- Price Type:
- Fixed Price: Box price stays the same regardless of added
products.
- Variable Price: Box price is calculated based on the products
added.
Save the Box
- After filling out all details, click Save.
- Repeat the process to add multiple boxes.
 Select Boxes
- From the dropdown list of boxes, select the box(es) you want to add to the builder.
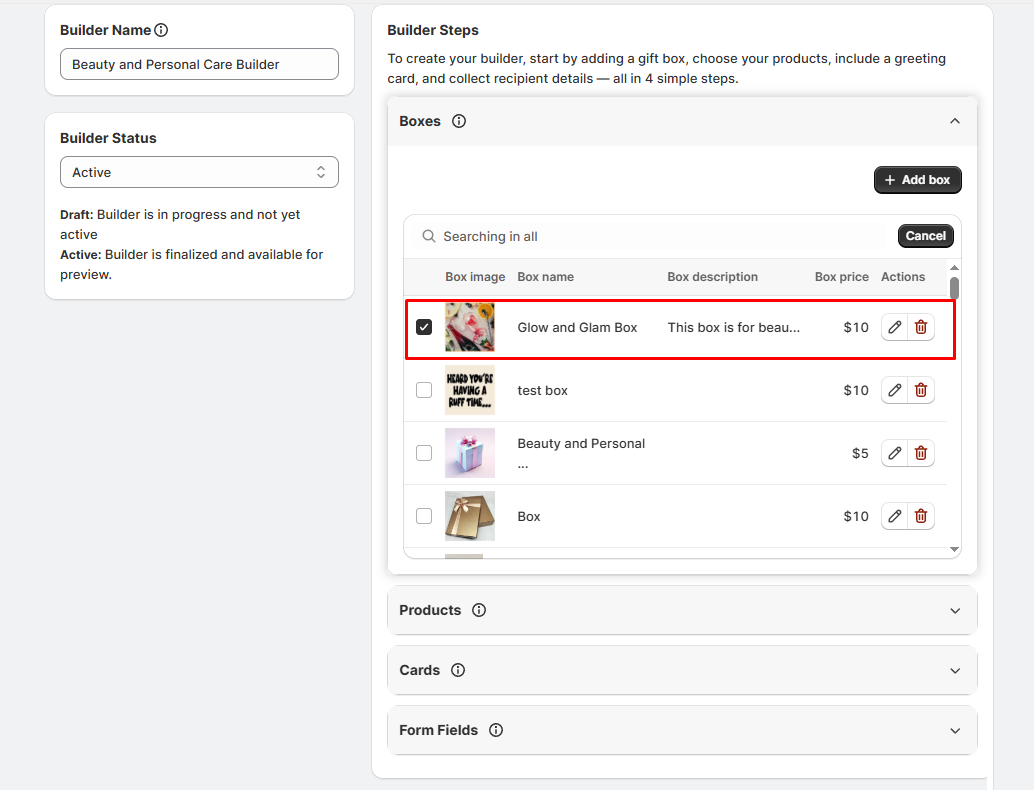
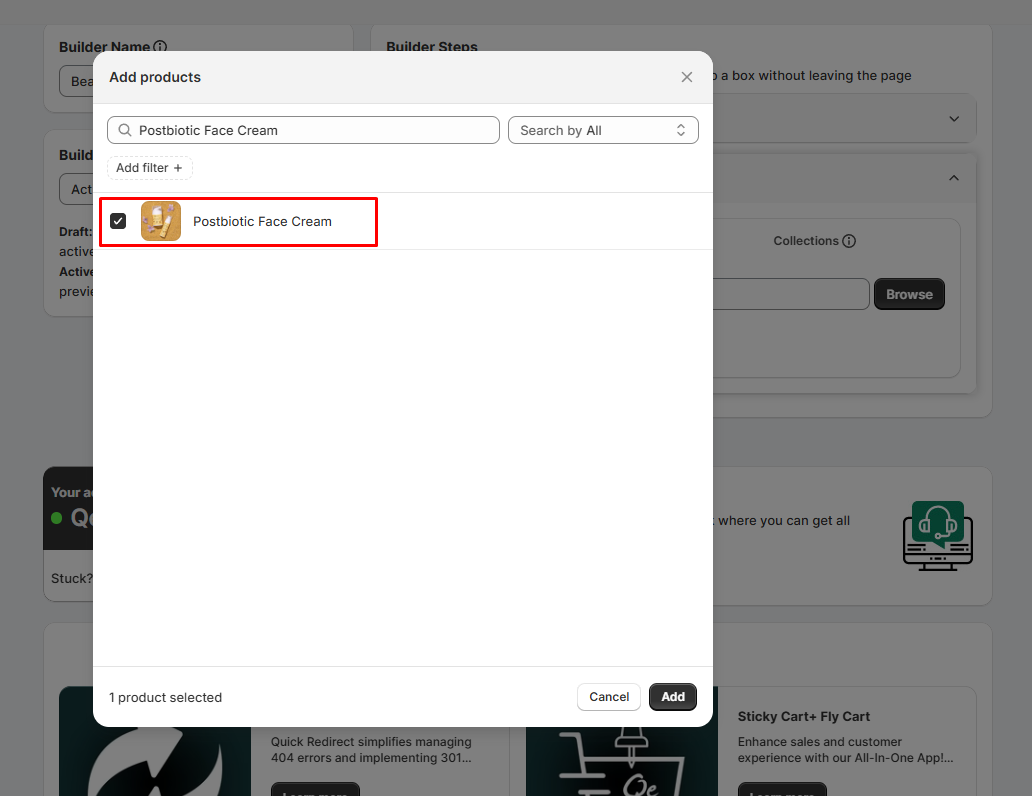
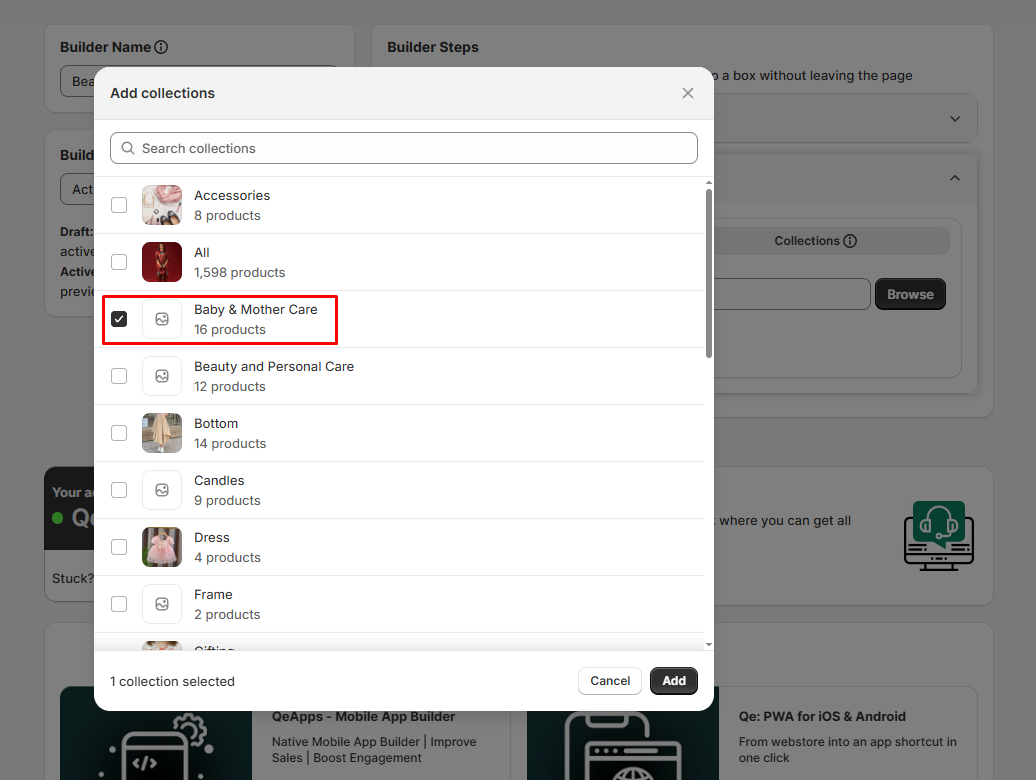
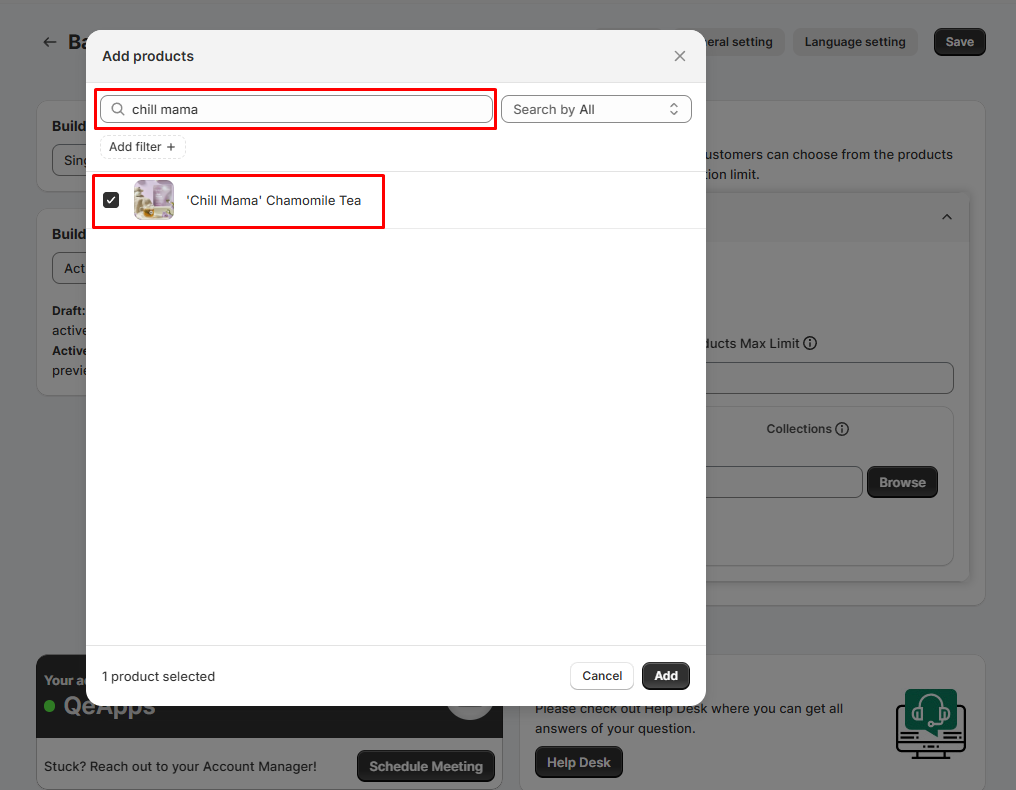
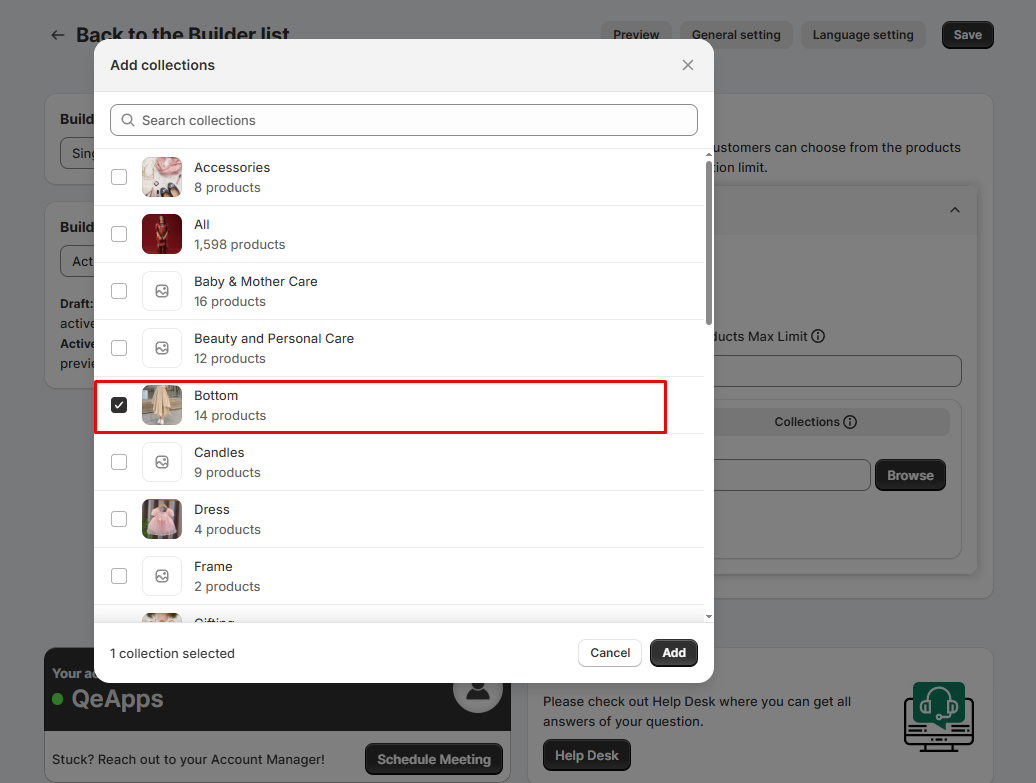
Step 3: Add Products
Add Products
- From the product dropdown list, select the products you want to showcase inside the gift
box.
Select Products
- Search for specific products by name
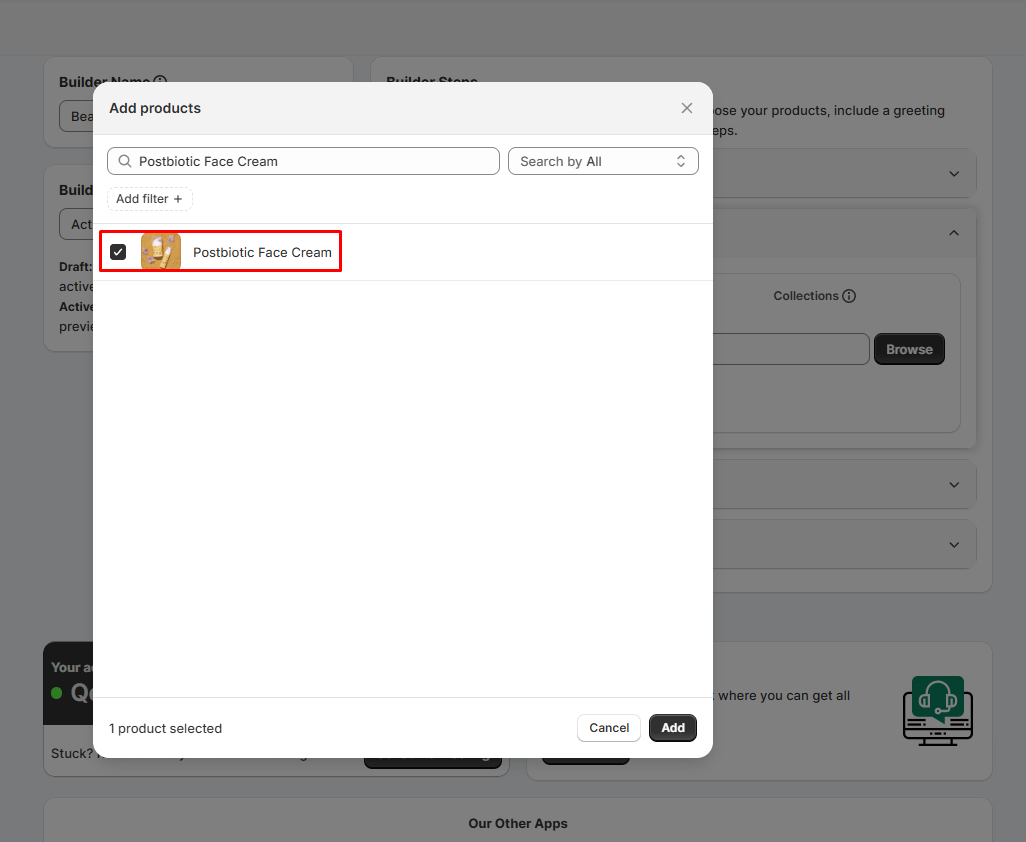
- Select an entire collection by clicking the checkbox.
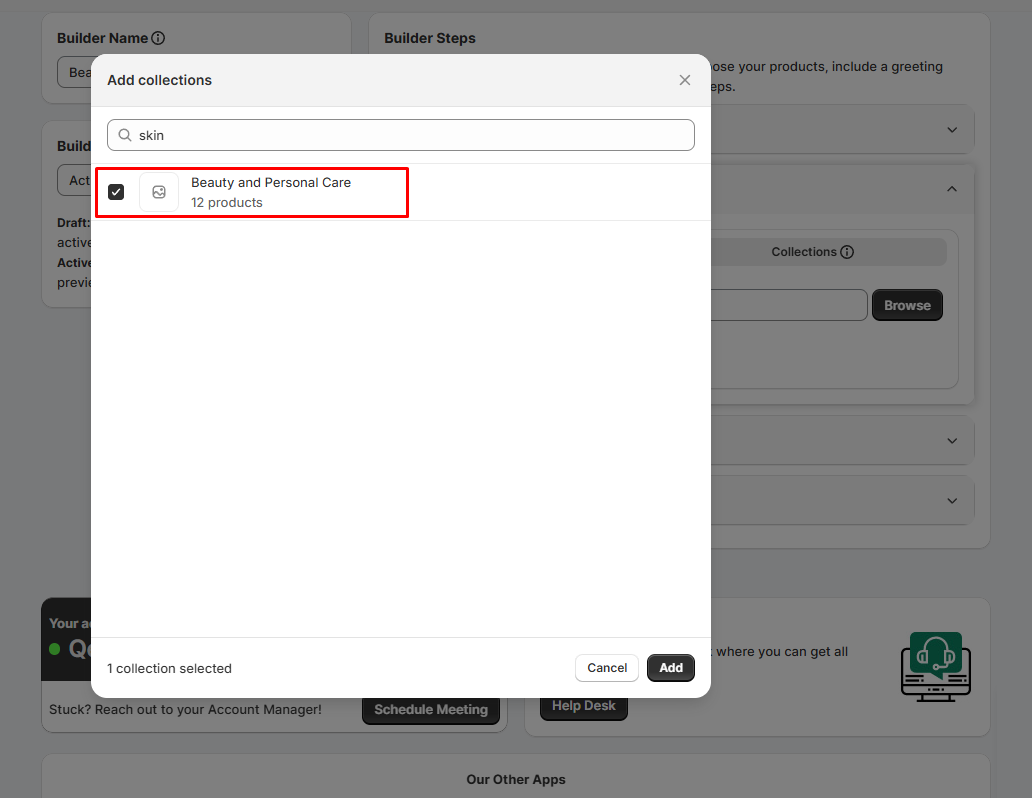
Tip:
- You can create a dedicated Giftbox Collection in Shopify for easier
management.
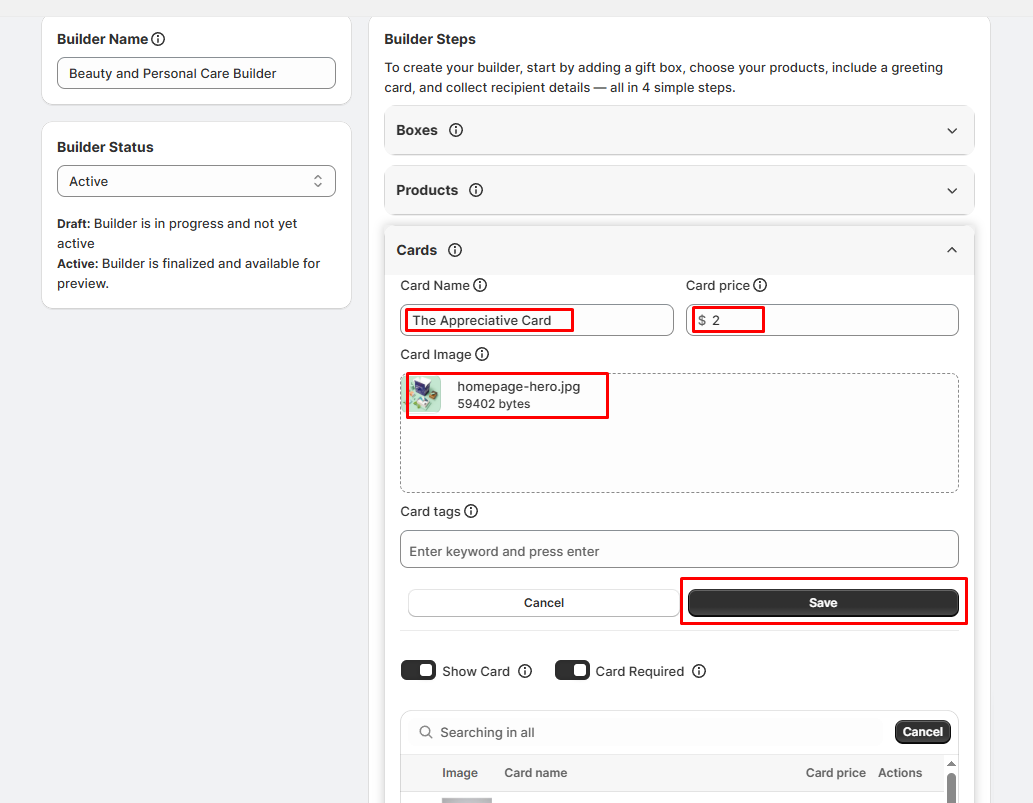
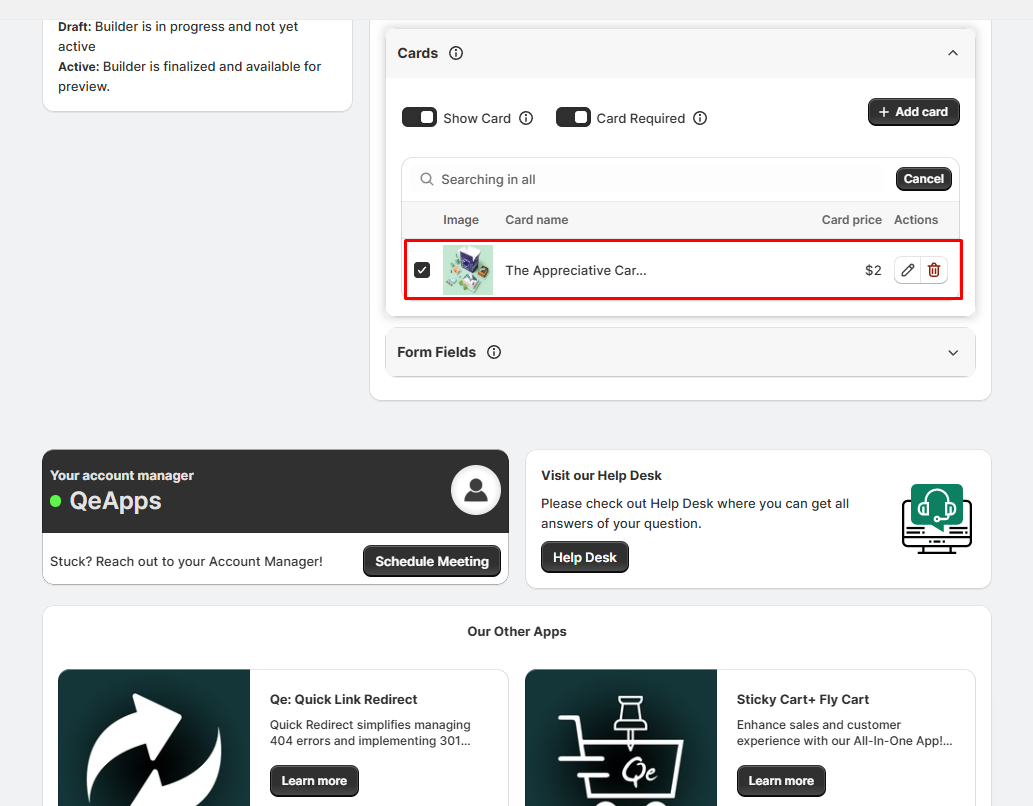
Step 4: Add Cards
Add a Card
- Click “Add Card” to create a greeting card option.
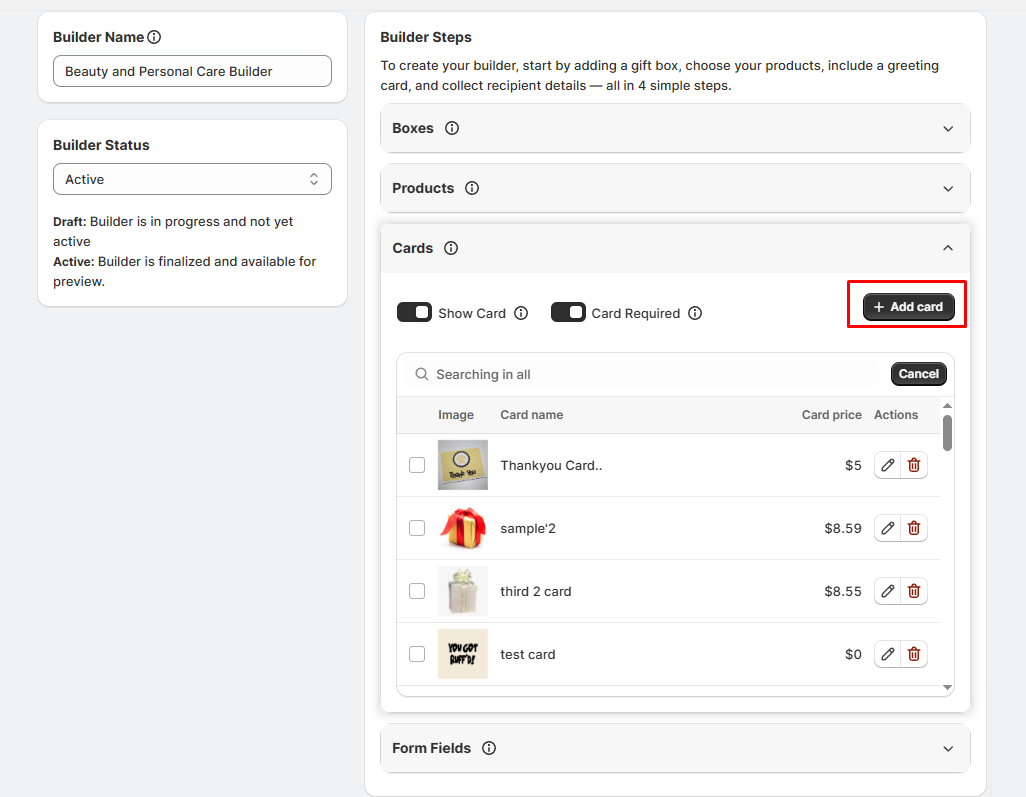 Card Details
- Card Name: e.g., “Christmas Card with Santa Print”
- Upload Card Image
- Set Card Price (use $0 if it’s free)
- Add Card Tags
Save Card
- After filling in the details, click Save.
- Repeat the process to add multiple cards.
 Select Cards
- From the dropdown list of cards, select the cards you want to add to the builder.
Step 6: Save the Builder
- Once done, click Save to finalize your builder.
4. Single-Step Product-Only Builder
Step 1: Name Your Builder
- Enter a name for your builder in the “Builder Name” field.
 Note:
Note:
- The builder name will not be visible to customers.
- It is only used internally within your dashboard.
Step 3: Save the Builder
- Once done, click Save to finalize your builder.
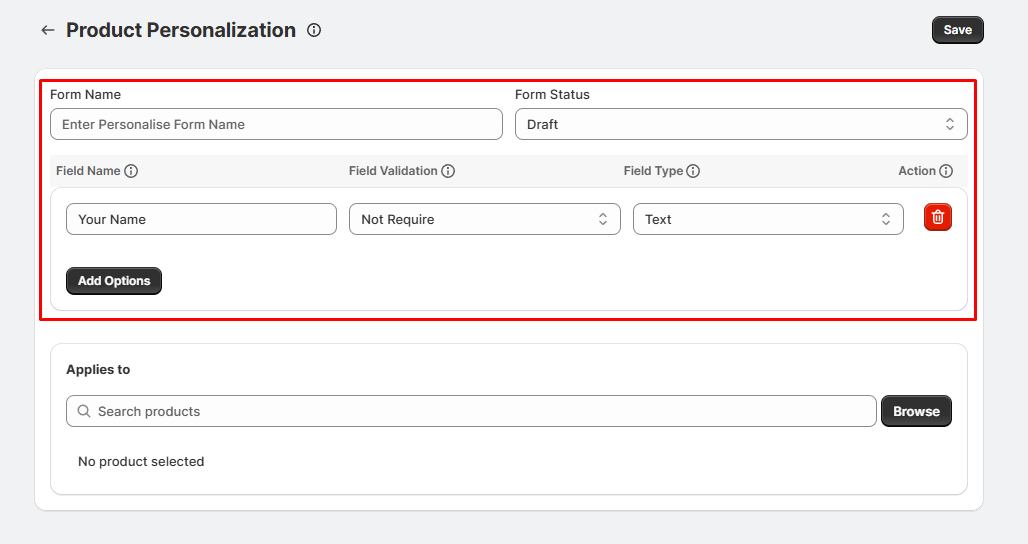
7. Enabling Product Personalization
Adding text fields, image uploads, and image checkboxes
- In the Personalization Step, you can add fields like:
- Text fields (e.g., “Enter a name for engraving”)
- Dropdown menus (e.g., select gift wrap type)
- Image uploads (e.g., upload a photo for a custom mug)
Best practices for customizable products
- Keep personalization options clear and simple
- Use character limits for text fields to avoid design issues
Ideal for items like mugs, pens, diaries, or customized gifts.
Select the personalization status to set the form as either Active or
Draft.
8. Using Discounts & Pricing
Order Amount
- Applies a discount based on total bundle value.
Product Specific
- Applies a discount on selected products/collections inside the bundle.
Volume Discount (Quantity)
- Discounts based on the number of items selected.
 Display settings & logic
You can show:
- Strikethrough pricing
- Savings message (e.g., “You saved $20!”)
- The discount will be applied on the preview page.
9. Managing Inventory
Auto vs. Manual inventory control
- Auto sync → When a bundled product is purchased, Shopify inventory is
updated automatically.
- Manual → For curated bundles with unique SKUs, you can update stock
manually.
 Real-time syncing with Shopify
When automatic sync is enabled (Quick Settings → Inventory), stock updates in
real-time to avoid overselling.
10. Adding Audio/Video Notes
How to allow customers to upload notes
In the Personalization Step, enable file upload fields. Customers
can upload audio or video messages as part of their gift.
File types, limitations, and where it appears
- Supported: MP3, MP4, WAV
- Limit size for smoother uploads (e.g., 10MB max)
- Uploaded files appear in the order details for the merchant
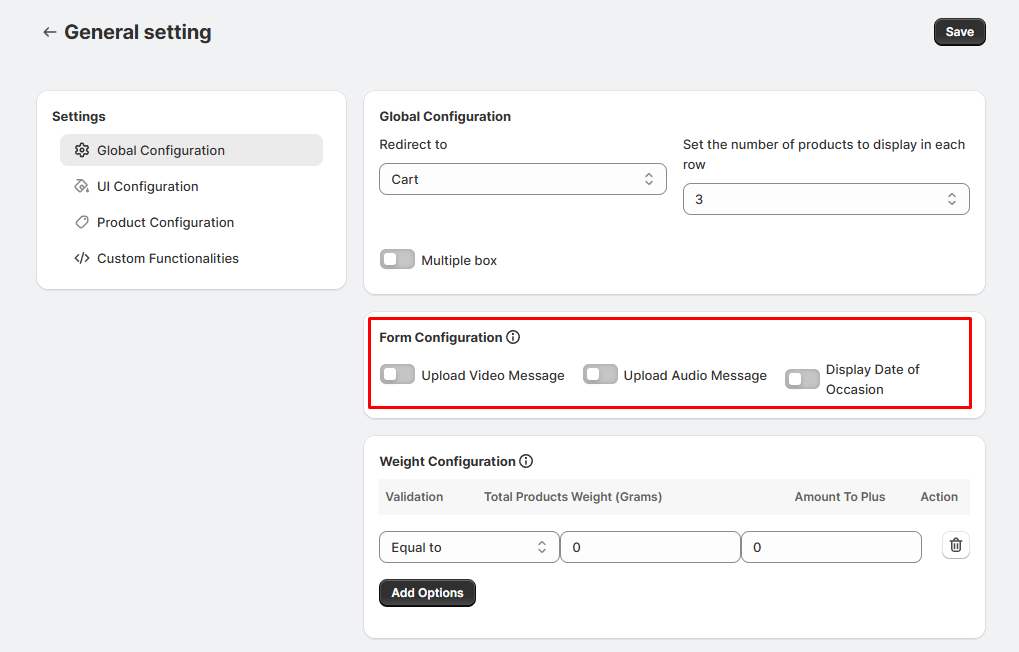
Please note that you can enable Audio/Video Notes from the General
Settings of the builder.
This feature is only applicable for the Box Builder and Box + Product
Builder, and not for the Single-Step Product-Only Builder.
11. Using Multiple Boxes
How to create and add multiple boxes
- You can easily create and add multiple boxes in a single session.
- Create different builders for various themes, occasions, or products (e.g., Birthday Bundle,
Wedding Bundle).
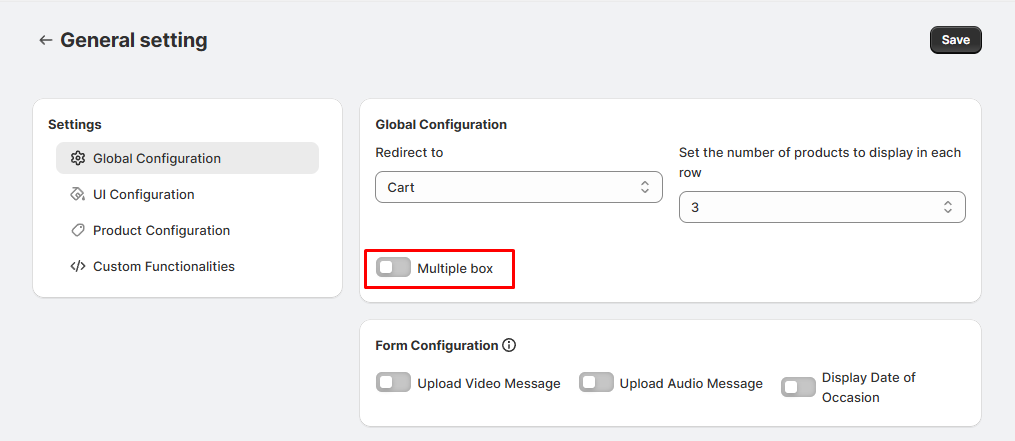 Important Note:
- You can enable Multiple Boxes from the General Settings of
the builder.
- This feature is only available for Box Builder and Box + Product
Builder, and not for the Single-Step Product-Only Builder.
13. Troubleshooting & FAQs
Common setup issues
- Builder not showing → Check if it’s Active, not
Draf
- Missing products → Ensure they’re published in Shopify
Personalization bugs
- Fields not saving→ Refresh and re-add the personalization field
- Image upload errors→ Check file size & supported formats
Media note errors
- Unsupported format → Use MP3/MP4/WAV only
- Large files → Reduce file size for smooth upload
FAQs
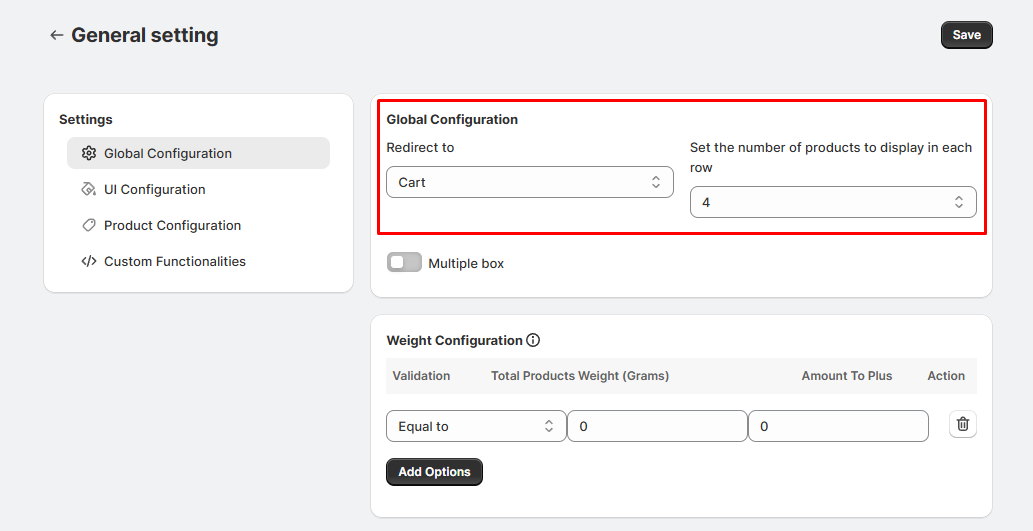
1. How do I create a “Bundle Gift Box Builder” bundle for customers?
2. Can I customize the look and feel of the bundle builder to match my store
theme?
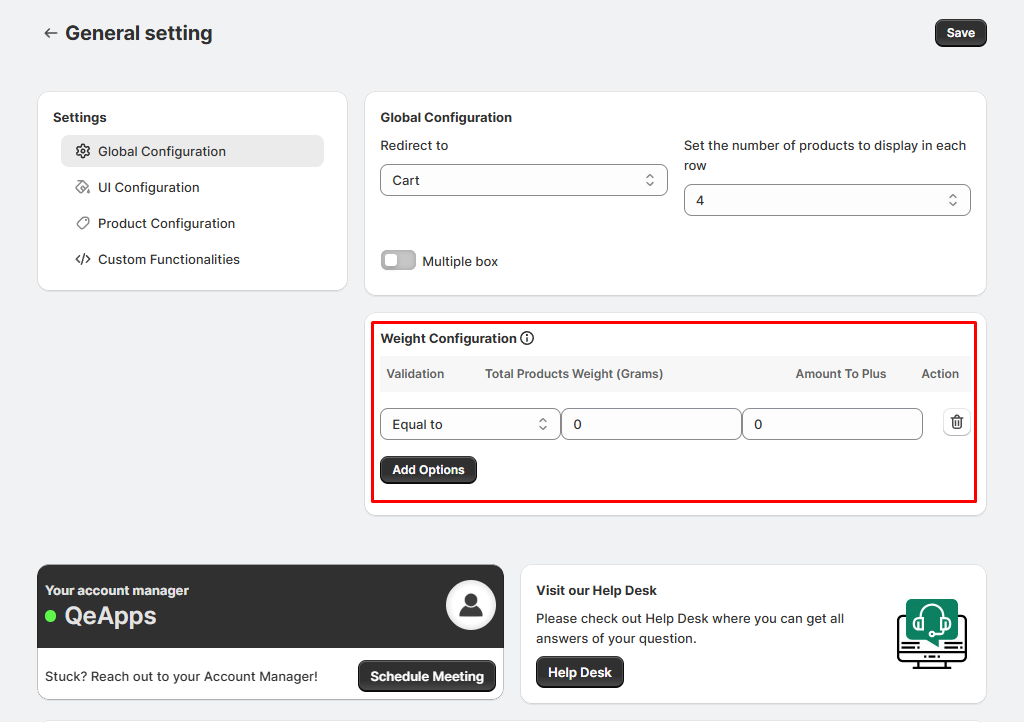
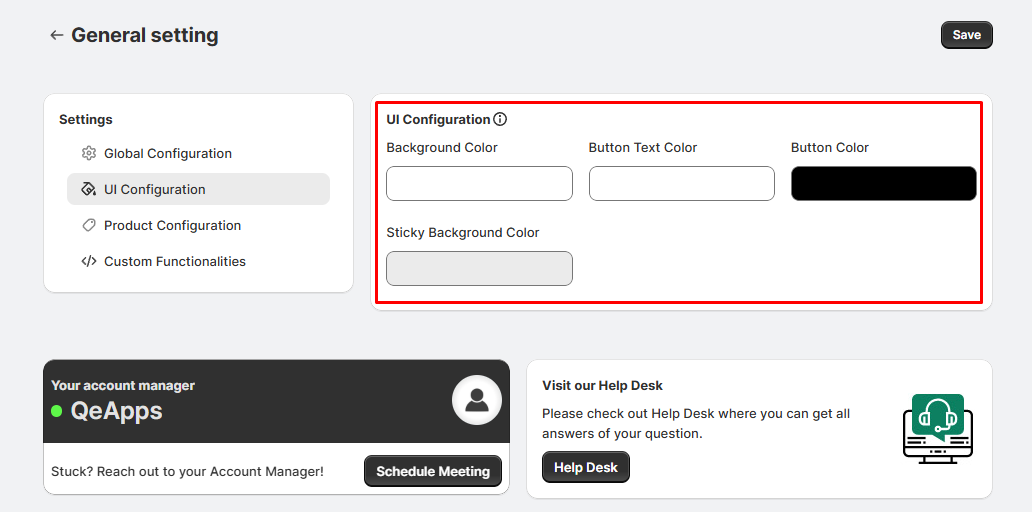
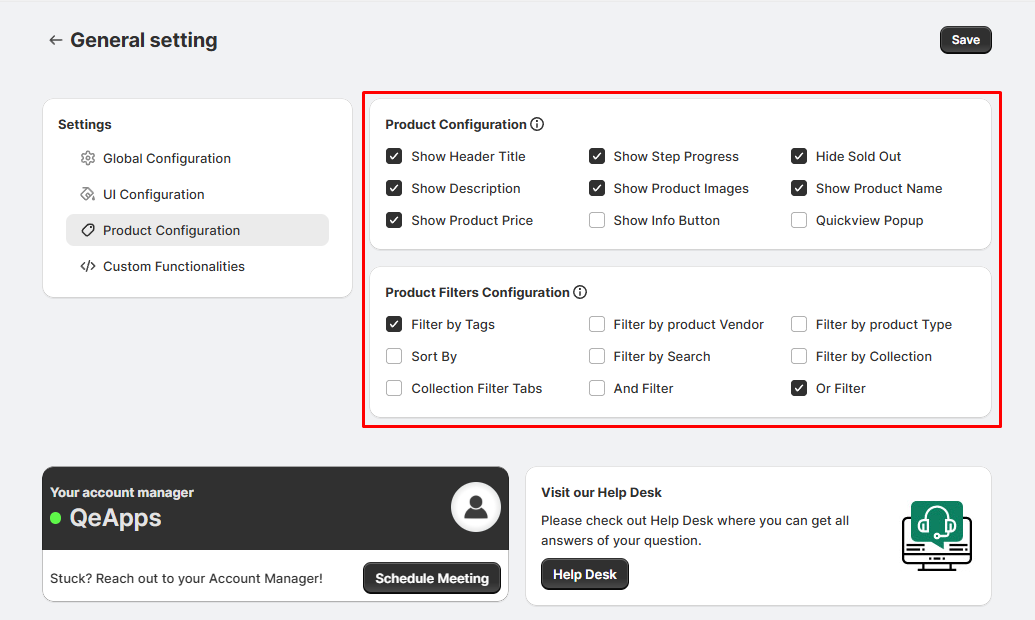
Yes! You can customize your bundle through its General Settings.
- Go to your list of builders and click Edit on the builder you want to
customize.
- At the top (near the Preview button), you’ll find the General
Settings option.
- Inside General Settings, you can adjust:
- Global Configuration – overall settings for your builder.
- UI Configuration – manage the look and feel of the builder.
- Product Configuration – control how products are displayed.
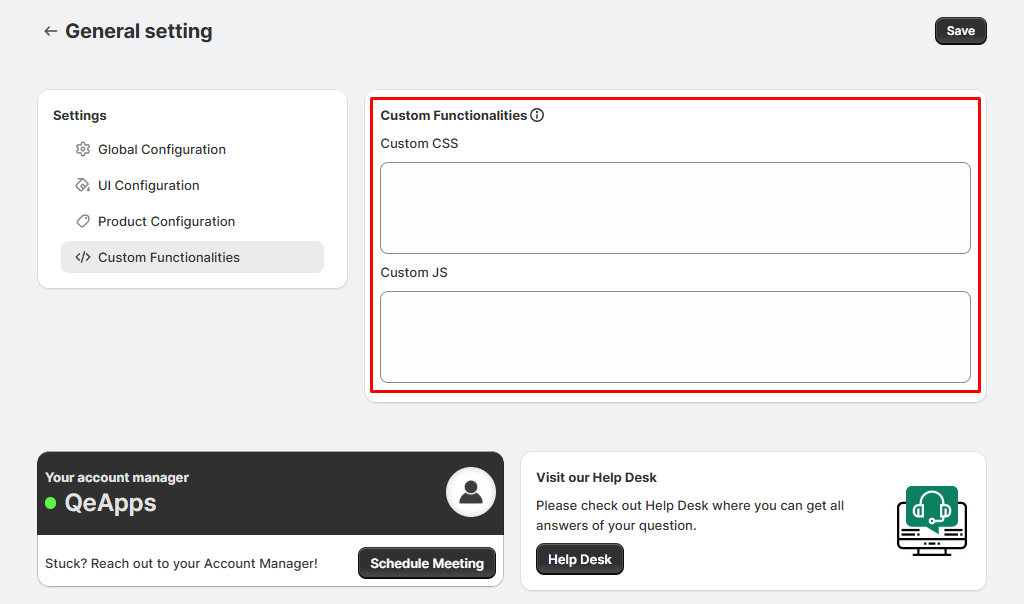
- You can also add custom CSS or JS to match your store’s branding and
design.
- If you need help with CSS changes or styling, our support team can assist you
to ensure
seamless visual integration with your storefront.
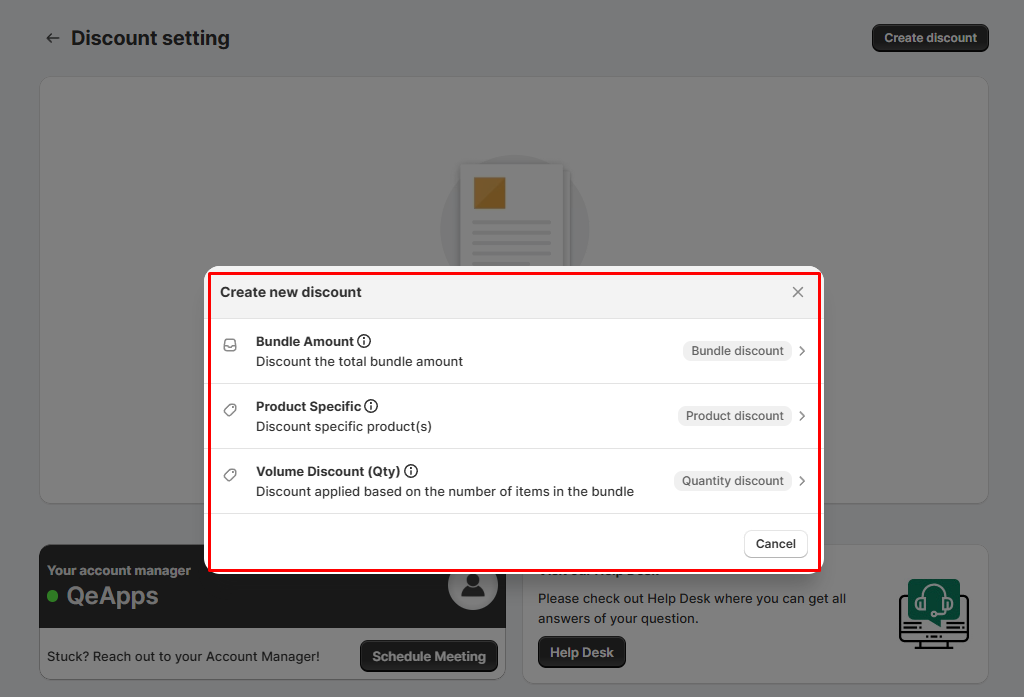
3. What are the different types of discounts I can create with this app?
Order Amount - Applies a discount based on the total value of the
customer’s order.
Product-Specific - Applies a discount on specific products or
collections chosen for the bundle.
Volume Discount (Quantity) - Applies a discount based on the quantity
purchased for specific products or collections.
How to apply these discounts in your builder:
- Edit the builder where you want to add the discount.
- At the top (beside the Save button), click the
Discount button.
- Click Create Discount and set it up as per your requirement—Order
Amount, Product-Specific, or Volume Discount.
- Save the changes, and the discount will be applied to the builder.
4. Can I limit how many products a customer can add to a custom bundle?
- Yes! When creating a bundle, you can set minimum and maximum selection
rules for the total bundle.
- For example, you can require customers to select at least 3 products and
up to 5 products to complete their gift bundle.
- This helps with structured product curation and better inventory
planning while ensuring
customers build the bundle as intended.
5. Will inventory be updated automatically when a product is added to a bundle?
Yes. The app supports both automatic and manual inventory
synchronization:
- When a bundled product is purchased, the stock is automatically deducted from
the
underlying Shopify product inventory.
- For curated bundles with custom SKUs, you can also manage inventory manually
if needed.
- This ensures accurate stock levels and helps prevent overselling.
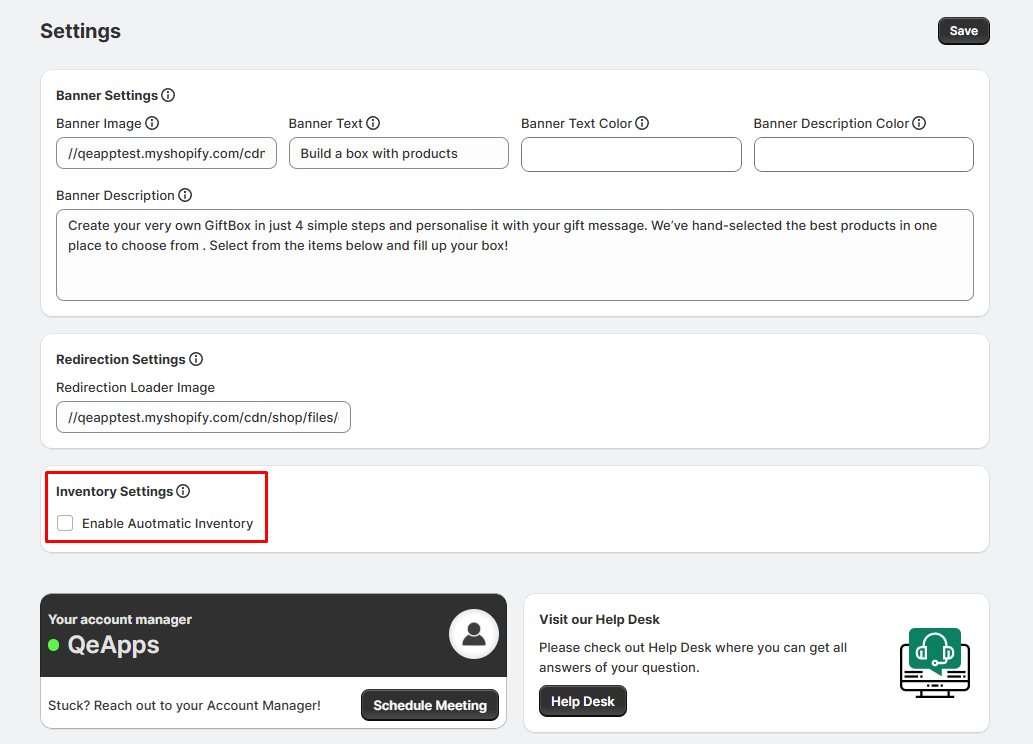
How to enable automatic inventory sync:
- You can enable this in Quick Settings. When you open the app admin,
look at the extreme left sidebar, and you’ll find the option to easily
enable
Automatic Inventory.

 Note:
Note:
 Box Details
 Select Boxes